Monday, November 19, 2012

Convert column data type from multiline to single line in SharePoint 2010


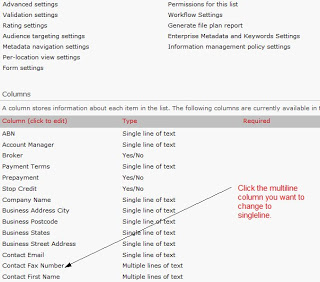
If you create a SharePoint list by importing a spreadsheet you will find that in SharePoint 2010 all free text columns are converted to the multiline data type by default.

This is a problem if you want to filter the multiline columns in a list by clicking on the column heading because column filtering will only work if the column is a single line data type.

So to change a multiline data type column to a single line do this:

1.  Browse to the "List Settings" for the list.

2. Click on the multiline column:


3. Change the Rich Text property to Plain text and press OK. Press OK again when warned:

4. Select the same column again as in step 2.

5. You should now see an option to change the data type to Single line of text. Press OK when done and press OK to the warning:


You can also do this in SharePoint 2010 Designer but you must first change the Rich text setting to Plain text and save the changes, then change from multiline to single line, click off the column, OK the warning then save again.

Thursday, November 8, 2012

How to get database records for last 7 days date or last week only


To get the records for the last 7 days, it would be something like:

select RecordDate, Id
from your_table

where RecordDate > DATEADD(day, -7, GETDATE())

To get the records for the last week only (within the last week not last 7 days)


select RecordDate, Id
from your_table

where RecordDate > DATEADD(day, -7, GETDATE())
and DATEPART(week, RecordDate) = DATEPART(week, GETDATE())


This query will return all records having a date later than 7 days before current date/time.

If you don't want the hours to be taken into account, then try something like this (works only on 2008 due to date datatype cast):

select RecordDate, Id
from your_table
where RecordDate > DATEADD(day, -7, cast(GETDATE() as date))
and DATEPART(week, RecordDate) = DATEPART(week, GETDATE())

Here's the version without the hours for 2005:

select RecordDate, Id
    from your_table
    where RecordDate > DATEADD(day, -7, CONVERT(datetime, CONVERT(char(10), GETDATE(), 
101)))
and DATEPART(week, RecordDate) = DATEPART(week, GETDATE())


That's it :)

Sunday, November 4, 2012

Column and View Permissions in SharePoint 2010


Recently I ran into a codeplex webpart that allows you to specificy column and view permissions for SharePoint 2010.

View permissions disable access to some views on a SharePoint Library or list, and the column permissions hide or set columns to ReadOnly for specified groups. Column permissions work on normal list views, where authenticated users will see columns. Column permissions also apply on the three default SharePoint aspx pages:

EditForm.aspx
NewForm.aspx
DisplayForm.aspx

This feature can be downloaded from http://spcolumnpermission.codeplex.com/

Install instructions and a more in depth description is given on the site. Below is a screenshot from list settings page where the view and the column permission for a list/library can be set up/configured


This Solution is only for SharePoint 2010!

Features:
Column Permission

- Hide or Read Only Columns in a List Forms (New/Edit/Display)
- Hide Columns in Views
- Hide Columns in Alert Me Emails
- Specify the permission for Users, SharePoint Groups or Active Directory Groups
View Permission
- Disable Views
- Hide Views in Context Menus
- Automatically Disable Views in Custom WebPart Zones
- Specify the permission for Users, SharePoint Groups or Active Directory Groups

Column Permission:
1. After successful Installation and Activation on Site Collection you will see two new links in your List/Document Library Settings page.


Wednesday, October 3, 2012

Top 10 SEO tips for bloggers


From years of experience in operating mainly WordPress-based blogs, I have learned valuable lessons on how to optimize blogs for search engines and increase traffic to the sites. Here are my Top 10 SEO tips for bloggers; I hope these insightful tips can help improve your blog’s SEO.

1. Conduct proper keyword research and use keywords in your title and content. The title in your home page is the most important place to feature your most important keywords. When you post new articles, keep in mind that most blog platforms will make your article title the HTML title tag as well. Therefore, create your titles with keywords you want to target.

2. Be familiar with your blogging platform to use built-in SEO features. Install additional SEO pluggins. For WordPress, "All in One SEO" or "Platinum SEO" is recommended. They offer many settings that help to create a more SEO-friendly site.

3. Use SEO-friendly URLs. Basically adding keywords in your URLs is a good idea. In WordPress, this is done by turning on a function called "Permalinks."

4. Write original content. Do not copy content from other sites, and if you do, make sure to rewrite it completely to make it your own. More often than not, duplicate content gets filtered by the search engines.

5. Write blog posts on a regular basis and cover the latest topics and trends, which tend to get more traffic while they are hot. Fresh content is part of Google's algorithm.

6. Optimize your image names and alt tags to include keywords for better placement in the image search portion of the search engines.

7. Publish links to your posts on social media sites like Facebook, Twitter and LinkedIn. Also, submit them to social bookmarking sites such as StumbleUpon and Reddit. Social media involvement and links are good for SEO purposes.

8. Build links to your main page and internal posts. If you own several blogs, try to find similar posts and link them to each other.

9. Write guest blog posts on similar sites for link building purposes. A good way to do this is to ask other bloggers to exchange articles, with guest blog credits. You can also participate in link exchange with other bloggers from blogrolls, but in general try to not have too many outgoing links from your own blogroll, as it may reduce the value of your website.

10. Go easy on importing RSS feeds into your blog. While it could be a good source for additional content, you want the majority of your content to be original. If you’re going to use RSS feeds, I recommend keeping it to less than 10 percent of your overall content. If your regular content does not keep up with that ratio, then remove old RSS posts regularly. There was a time when the "Autobloged" plugin for WordPress was being used by many bloggers, or I should say spammy bloggers, with great success. Sites would receive a massive amount of content in little time and would end up getting hundreds of rankings. However, the Panda update makes this difficult.

While there are many more tips I can share with you, the ones I mentioned are my top ten. I hope you enjoyed the article and that the tips can help you to improve your rankings.

Sunday, July 22, 2012

Remove Format when copy paste in rich text editor in SharePoint 2010


How to avoid the formatting that comes along when you copy paste content from a site or word document to the Rich Text Editor (RTE) field in sharepoint? Ofcourse RTE already have an option Clear Formatting that can be used to clear after pasting the content,, but I do not want the format to be copied at first.

So after digging into SP.UI.RTE.js I have come up with a small script that will not paste the markup but only text.


    //Disable the RTE paste option. Restricts to "Paste Plain Text"
    function disableMarkupPasteForRTE()
    {
     Type.registerNamespace("RTE");
     if (RTE)
     {
      if(RTE.RichTextEditor != null)
      {
       RTE.RichTextEditor.paste = function() { RTE.Cursor.paste(true); }
       // Handle Ctrl+V short cut options in rich text editor
       RTE.Cursor.$3C_0 = true;
      }
     }
    }

I used the below standard sharepoint javascript function that will run the above or any javascript function on load of page.

    _spBodyOnLoadFunctionNames.push("disableMarkupPasteForRTE");

The final script will look like this:


<asp:Content ContentPlaceHolderId="PlaceHolderBodyAreaClass" runat="server">
<script type="text/javascript" id="disableMarkupPasteForRTE">
//Disable the RTE paste option. Restricts to "Paste Plain Text" 
    function disableMarkupPasteForRTE()
    {
     Type.registerNamespace("RTE");
     if (RTE)
     {
      if(RTE.RichTextEditor != null)
      {
       RTE.RichTextEditor.paste = function() { RTE.Cursor.paste(true); }
       // Handle Ctrl+V short cut options in rich text editor
       RTE.Cursor.$3C_0 = true;
      }
     }
    }
     _spBodyOnLoadFunctionNames.push("disableMarkupPasteForRTE");
    </script>
</asp:Content>


Wednesday, June 6, 2012

Four Critical Web Design Rules


"Content is King! If you want a website to generate back-links and have quality content the search engines love, be sure to make it readable by both people and search engines. Search engines are working to give people quality results. Thus, they are looking for sites with quality content. So - by building site content for people, not only are you getting back to basics (information dissemination to people via the Internet), you are creating a site search engines will love. So, build sites for people - and the search engines will come.

When creating a new website or redesigning an existing site, there are four critical rules which should be followed to make the site effective, functional, loved by search engines - and successful.

1. Easy to Read

When building a website, the first thing you need to be sure of is that your website is easy to read. When you write content, remember that most web site visitors don't read every word of a page - in fact, they only scan pages to find what they want.

Break up Your Content

Break up your pages and use headers between major ideas so people scanning your site can find what they want quickly. Use meaningful headers between each paragraph or major idea - this helps with SEO. Headers should be created with the H1 through H4 tags for SEO. Always use good writing structure. Additionally, avoid long paragraphs that run on. You should break up any long paragraphs.

Color and Fonts

To help readability, use high contrast colors between font and background. Black text against a white background may seem stark, but it is very readable. To make a website easy on the eyes, try an off-white background and a dark gray (almost black) text color.

Things to avoid with content color: 
  • Avoid vibrant background colors like purple or yellow. Such back colors make text difficult to read.

  • Avoid using an image behind your text.

  • Avoid using bright text colors on bright backgrounds.

Fonts Matter

One simple statement covers the font issue: 

Simple fonts are the best; the more fancy the font, the harder it is to read. 

Since many browsers only have the standard font set, use standard fonts. In reality, there is no "standard", but there are certain fonts that are installed on most browsers. These include Arial, Verdana, Tahoma and Times New Roman. Your readers will see something different than you see if you use other fonts. 

Standard Compliant Browser for Development

When developing and testing your site, use a Standards compliant browser like FireFox. If you develop your site to be standards compliant, it will work in most browsers, including MS Internet Explorer (IE). It is recommended that you test your site using the latest and last browser versions of IE (IE6 and IE7). To run multiple versions of IE on the same machine, TredoSoft.com has a free installer that will install multiple versions of IE. It works great! 

Keywords in Content

Of course, when writing content, not only should it be formatted to be readable, but it must also be consumable by not only people, but by search engines. One way to make the subject of the content known to search engines is to use the keywords that people use to search for your site in your content. Be sure to use keywords in your header tags, your first paragraph and throughout your text. The keyword density should be between 4% and 7% - but any more than that could 1) be hard to read and still make sense and 2) be considered spam by search engines and banned. Keywords should also be used in your TITLE tags and your Meta description. 

2. Simplify Navigation

The menus and links make up the navigation that the visitor uses to get from page to page in a site. Always plan a site around how people will get from page to page. A visitor to your site should be able to get to what they want within three clicks of their mouse. 

Multiple navigation points makes it easy to find things. Repeat the top menu and at the bottom. Also create a left or right menu. 

Using links within your text to other areas on your site. You can create links so that they are good for search engine optimization (SEO). There are generally two ways to create links within your text: 

  1. The wrong way: "For search engine optimization techniques, click here."

  2. The right way: "Good techniques for search engine optimization are important to use."

Using link text (anchor text) that describes what the link is about is the best way. Search engine web crawlers (programs that automatically index the contents of websites) visit your site, they "read" links. Spiders can index descriptive links into a subject or keyword category. Spiders have nothing to work with when reading a "click here" until it reaches the linked page. 

This is Cross Linking - use it as much as possible when it makes sense to do so when writing your content. 

3. Consistent Design

At most, one or two layouts should be used in your site design. As a reader browses your site, they should be able to get used to looking in the same place for your navigation, for your sub-navigation and for your content. That's all there is to say about that. 

4. Lower Page Weight is Better

Page weight is the total size of a page on your site in bytes - code, text and images. Your site's page weight makes a big difference to your viewers. Lighter page weight is better for your readers because the page will download faster. The faster a page downloads, the faster they will get to the content. 

What is Means to be Light

  • No large images.

  • Fewer images are better.

  • Optimize images for the web at no more than 72 dpi

  • Use as small an image dimension as possible for the given design.

  • Use a table td bgcolor attribute or a background-color style attribute for solid color backgrounds.

  • Make gradients horizontal or vertical (not diagonal) so that you can use a small image "strip" and repeat it.

How "Heavy" Should a Web Page be? 

Certain studies show that 64K is a good maximum webpage size. 64K is a maximum, however it is still, in my opinion, really big! The smaller the page, the better. 25K is good, 15K is even better. There is a balance between design and function. It is a good idea to focus more on function. 

Try putting pages on your web host server as you build your site so you can test it as you go. For pages online, you can test the page weight at www.quasarcr.com/pageweight/ to be sure you are on track. 

Ways to make pages lighter: 

  • Use linked style sheets

  • Use DIVs instead of TABLEs where possible

  • Use simple repeating backgrounds for effect

Summary

Visitors to your website should be able to find what they are looking for within about three clicks. Search engines should be able to navigate easily through your site. Making a site easy to read with consistent page design, and easy to navigate will make it easy to find information. When people can find information, they are more likely to refer your site or link to it - which is exactly what you want to encourage. You will be on the way to building a readable and hopefully successful website that is loved by search engines if you follow these principals.

Accepting Credit Cards on Your Website


Are you thinking of selling things on the web? If so, you will probably also be considering some way in which you can accept credit cards on your site. Since new webmasters who visit thesitewizard.com often ask me about how they can get started accepting payments in this form, this article provides some basic information on adding credit card payment facilities to your website.
(Note: if you do not already have a website, you may also want to read How to Create / Make a Website: The Beginner's A-Z Guide.)

Why Do It?

Credit card payments allow you to take advantage of the following types of customers:
  1. Impulse buyers

    After reading your advertisements and hype on your site, buyers would be all fired up about your product. If they have a means of making a purchase immediately, you've secured that sale. If you only allow cheque payments, the additional time it takes for them to get their cheque book and mail out the cheque may be a deterrence. They may also have second thoughts later.
  2. International customers

    Credit card payment is a tremendous convenience if your customers are overseas. It automatically takes care of the problems of currency differences as well as the time it takes for a cheque to travel to the vendor. You will lose a large number of overseas customers if cheque payment is the only way you can accept payment.

Methods of Accepting Credit Card Payments

There are actually two ways in which you can accept credit cards on your site.
  1. Using Your Own Merchant Account

    To do this, you will need a bank that will allow you to open a merchant account. Requirements for this will vary from country to country, and you should check with your local banks for more information on this.
  2. Through a Third Party Merchant

    There are numerous companies around that are willing to accept credit cards payments on your behalf in exchange for various fees and percentages. These are also known as "payment gateways".

Which Method Should You Use?

The initial costs of opening your own merchant account is usually higher than when you use a third party merchant. Indeed, some third party merchants have no setup fee at all.
However, the transaction fee (which is what you pay the bank or third party merchant for each sale) is much higher when you use a third party as compared to when using your own merchant account.
A third party merchant is usually convenient to use when you don't know if you can actually make much out of your product or service. If you just want to test the water to see how things are, this is usually a good way to start. It is also convenient in that the merchant takes care of everything for you. You just get a cheque at the end of each payment period (if you have earned enough) and concentrate on your products, services and customers. Another benefit is that if you use a reputable third party merchant, your visitors may be more willing to buy your goods online since they trust that merchant to keep their credit card numbers safe.
Having your own merchant account lowers your transaction costs. However, you have to be careful to minimize your credit card risks since you'll be processing the credit card payments yourself. This is not to say that there are no risks attendant in using a third party merchant.

Some Third Party Merchants / Payment Gateways

Here's a list of some third party merchants that you might want to consider if you're looking for ways to accept credit card payments. Except for PayPal, I have not actually tried any of them myself (as a vendor). Check them out carefully and use them at your own risk.
Note that rates and stuff that I publish below were correct at the time I investigated these vendors. It will most likely have changed by the time you read this since the merchants tend to modify their rates from time to time according to market conditions. Make sure that you check the current (up-to-date) details from their site before making any decision.
The list is arranged alphabetically.
CCBill: There are no setup fees. Transaction fees vary (I can't find the schedule though) depending on the volume of sales in each accounting period. According to their website, "these fees are never more than 13.5% of revenues charged during this one-week period for CWIE hosting clients and 14.5% for non-hosting clients".
CCNow: This is only for people who ship tangible, physical products. There is no setup fee, and they charge 9% per transaction except in the November and December where the fees are 8% per transaction (yes, lower).
Google Checkout: Google has its own payment gateway that is available for US and UK sellers. It is mainly for use if you are selling tangible and digital goods, although you can also use it to charge for services and subscriptions. Charges range from 1.9% + $0.30 USD to 2.9% + $0.30 USD per transaction, depending on the volume of sales in the previous month. If your buyer is not from your country (ie, not in the US if you are in the US, or not in the UK if you are in the UK), there is also another 1% processing fee.
Kagi: Kagi's fees seem to vary according to the order size, type of item sold and the type of payment (credit card, cash, money order) used by your customer.
PayPal: This well-known service allows you to set up a Premier or Business account (you are subject to certain limits when receiving credit card payments if you use a Personal account, and probably also higher fees per transaction). The charges range between 1.9% + $0.30 USD to 2.9% + $0.30 USD for each transaction if you are in the US. Non-US users are charged different amounts according to the country. From experience, I find this service easy and fast to setup.
ProPay: A new competitor to PayPal (see elsewhere on this page) that currently only caters to US residents. Depending on the type of account you sign up for, you have to pay an annual fee (starting from $34.95) as well as transaction fees of 3.5% + $0.35 USD. However, to accept cards like American Express and Discover, you have to use their more expensive plans.
RegNow: Designed for software authors to sell their ware, this merchant charges a one-time activation fee of $19.95 USD plus a transaction fee of 6.9% plus $1 USD per unit for their commission (minimum $2 USD charge). They also provide you with facilities that allows you to easily set up an affiliate program.

How to Put an Order Form or Shopping Cart on Your Website

Once you have signed up the vendor of your choice, you will be able to put an order form or shopping cart on your site. Each vendor has a different method for this, but most, if not all, will provide you with premade forms that you can customize for your product or service.
(Note: if you use PayPal, and don't know where to start, see my tutorial How to Put an Order Form or Buy Now Button on Your Website Using PayPal for a step-by-step guide.)

Trying It Out

Whichever you choose, if you are selling things on the Internet, you really have not much choice but to accept credit cards. You probably don't know what you missed until you try it out.
All the best for your business!

This article can be found at http://www.thesitewizard.com/archive/creditcards.shtml